Table of Contents
ELF-A
ELF-A is the Electromagnetic Lorentz Force Accelerator. This project aims to design and build a railgun accelerator to add-on or integrate with a standard airsoft gun which shoots 6mm spherical shots–specifically the off-the-shelf 6mm 0.29g aluminum.
A stock high-end airsoft gun fires about 120 m/s. The goal is to accelerate this stock speed to at least 350 m/s (above the speed of sound). If this goal is reached, the next steps will be ever-increasing the energy put in. High charge times and slow rate of fire be damned!
Why an accelerator
Why not build a standalone railgun?
Work done by another engineer (whose website I cannot locate) showed that far too much energy is wasted trying to get a static load moving. If you inject the project with a burst of air you greatly increase the efficiency of the railgun; decrease wear on the rails; and reduce the risk of both the rails and the projectile melting.
On top of this, I was struggling far too much with trying to design (and fabricate) the basic mechanics of a multi-shot gun. By simply building a add-on accelerator for a wide and varied existing platform I can focus on the innovative part (the accelerator itself) rather than be bogged down by the more mundane details (how to load and inject projectiles).
Design Plans
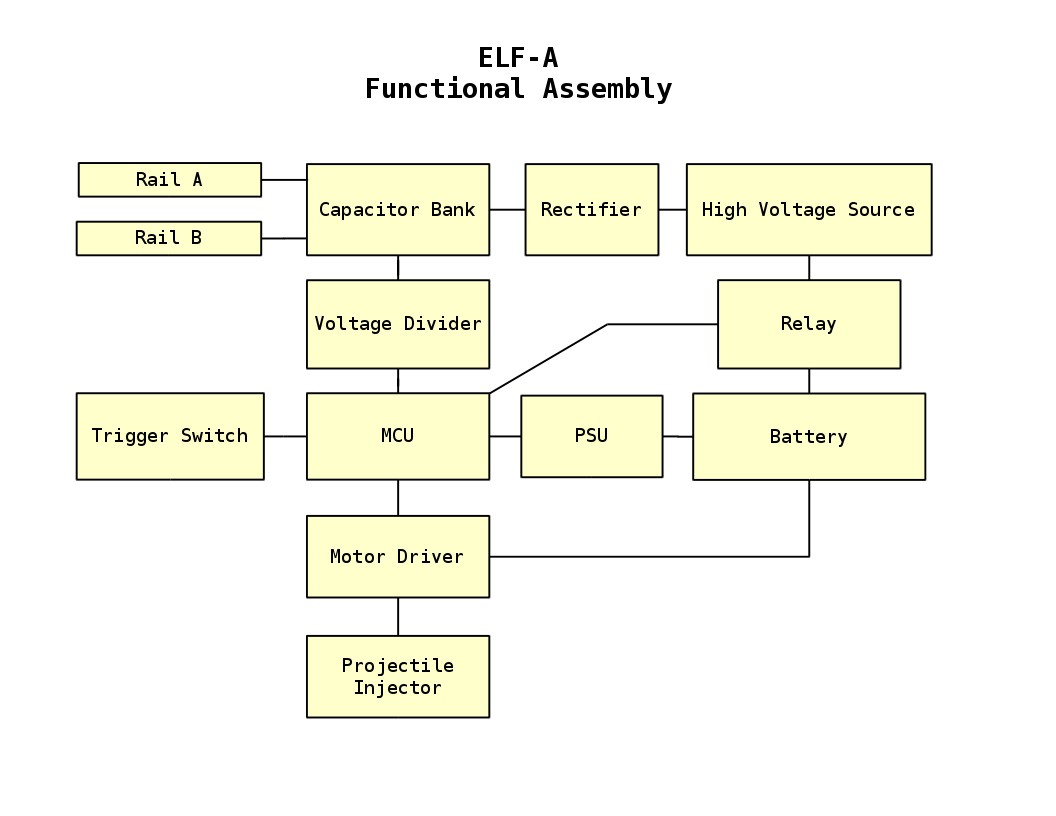
Functional Assembly
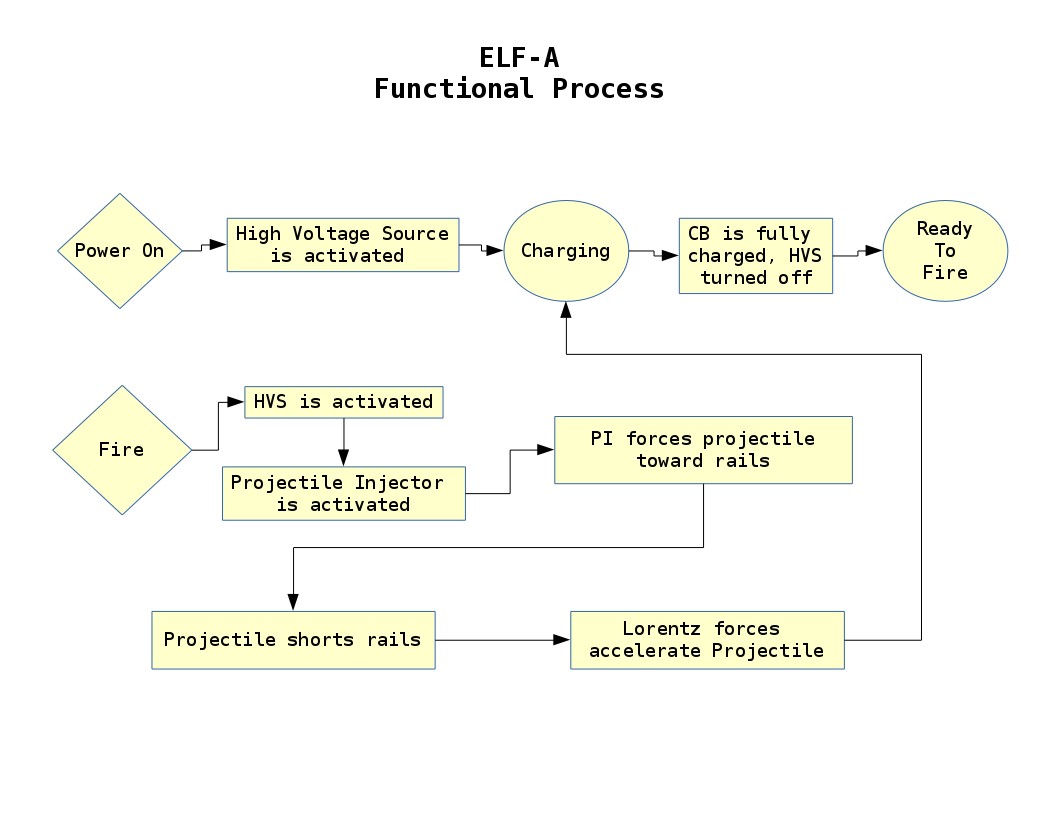
Functional Process
I have opted to ensure a good rail-projectile contact by using a voltage high enough to bridge the gaps between the projectile and rails. This means using a voltage of 1000 volts or more. Since using capacitors that are that highly rated (and to a certain extent, the point of this project is to build from reclaimed material) is prohibitively expensive and the capacitors I've been collecting are at best rated for 450 volts, I have come up with a hybrid-solution.
The high-voltage power source (HVS) will be generate 1000+ Volts. The Capacitors will be charged only up to their max rating (monitored via a voltage divider and the MSP's builtin ADC or via an OP AMP acting as comparator) and then the HVS will be shut off.
…And in typing this out I realized if the capacitors are not charged to the same voltage as the HVS then there will not be 1000 measurable volts going to the rails, but will be limited by whatever the capacitors are charged to. Well. Back to the drawing board.
Hardware
Pistol to use: http://www.amazon.com/CYMA-CM123-Airsoft-Electric-Pistol/dp/B00FRRLPCS
Carbine conversion kit: http://us.redwolfairsoft.com/redwolf/airsoft/Accessories_Conversion_Kits_GBB_AABB_1911_MEU_Carbine_Conversion_Kit_Black.htm
Mark I
Fully external, manually charged and manually switched to firing mode. The accelerator rails screw onto end of airsoft gun.
The charger is a simple oscillator + Power FET + Step up Transformer + Rectifier.
| Battery | ||||||
| Charger | ||||||
| Capacitor Bank | ||||||
| Rails | ||||||
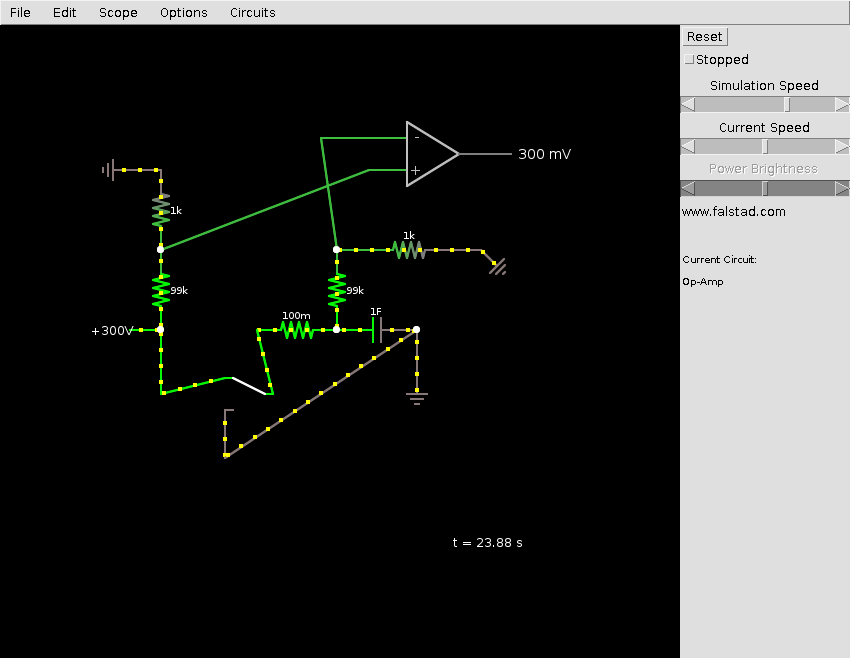
Here's the charge detect schematic. Turns out the answer to “how do I tell if my capacitor bank is done charging?” is use resistors to make a voltage divider for the 300 volt source and for the capacitors and then use an op amp as a comparator and feed the result to either a microcontroller input pin or an indicator LED.
Mark II
Same as Mark I, but MCU controlled. Automatically charged, integration with original gun's trigger.
Possibly modify the airsoft gun to use, rather than a spring and plunger with a gearbox, a high-impulse solenoid making a sort of hybrid between a coil gun and a light-gas gun.
Mark III
Uses same MCU as Mark II, but is fully integrated, non-separable from the airsoft gun.
Mark IV
High-end kit using advanced materials. Copper-Tungsten (10:90 ratio) alloy for rails, high-end capacitors and multiple banks for rapid fire, large capacity deep-cycle battery.
Notes
If I had a high voltage battery I could charge and fire relatively quickly assuming I built everything to a rather high wattage. I would need a 1 kilowatt rated 100 ohm resistor to charge the banks.
Looking at the math we see somewhat dire numbers.
Assuming I make use of cheap, 20W 12V-to-220Vac inverter. Given it takes a capacitor `t = RC ` time (in seconds) to charge to 67% of the source voltage, where `R ` is resistance in Ohms and `C ` is capacitance in Farads, we can use Ohm's law to determine approximate charge time given current limitations. Shift ` V = IR ` to ` R = V/I `.
40 minutes to charge. Ouch.