Table of Contents
Workshop
Notes for my investigation into building a workshop.
NEW PLAN
Sticking with the poured concrete foundation, which will cost between $2,700 and $3,600 for a 24×31 area.
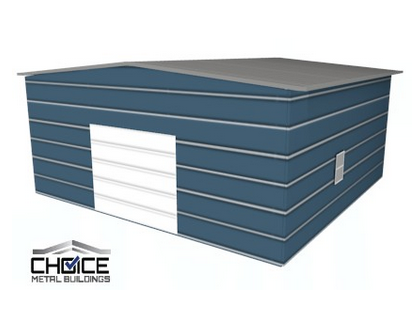
The building itself will be from Choice Metal Buildings.
The walls are 12-feet tall, with a 25'x 30' layout. A single 10'w x 8'h garage door will be the only entrance and exit.
A pair of 30'x30' windows fill flank the garage door.
The inside will be still be framed, but that's for mounting electrical and other internal structures (built in desks and shelves).
- Air Conditioner (18K BTU needed)
Location
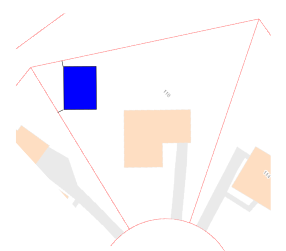
Where do I put this dang thing?
About here? (The little legs touching the corners mark 5'–the closest an accessory structure may be built to a property line.)
Deployment
Phase 1: Land Prep
DONE
The area where the workshop is going to go needs to be prepped. All the cedar trees need to be taken down. Stumps need to be dug out and removed. Any smaller woody plants need to be removed. The land needs to be leveled and raised a little.
Consult with some guides on prepping land for a slab.
Phase 2: Permits
File paperwork with city and get permits.
Phase 3: Slab
DONE
Have the slab poured.
Phase 4: Building Erection
Choice Metal Buildings delivers and erects buildings purchased through them.
Order placed through Alan's Factory Outlet.
Phase 5: Framing
Wood studs will be put in to support shelves and allow for easier addition of wiring as well as insulation.
Phase 6: Power
Have Duke Power come out and add a power hook up to the building. This will take some research. I'm not sure if it's better to have power ran from the house out to the building (unlikely) or have a separate meter installed for the work shop (likely best option).
Research is needed to see what must be done before they'll install a meter. This will also take some city-permits.
Standard 3-prong electric outlets will be installed at a rather high density (perhaps 1 outlet ever 3 feet?) as well as overhead florescent lights.
Along with running power, a few cat-5e cables could be ran from the house to the workshop for network connectivity as well as other communication (e.g. analaog audio).
Code Requirements
Accessory structures must provide at least 60A service. Exceptions to the 60A minimum exist for one- and two- circuit service to accessory structures.
A 20A circuit could be provided for lights + computer/electronic equipment and a second 20A circuit could be for powertools, of which no more than 2 at any time would operate (shopvac + larger tool).
Regardless of whether code says I need a dedicated grounding rod + ground loop, I will install one.
Phase 7: Insulation
Spray foam insulation can be added (once all wiring is done)
Phase 8: Floor
Something a little nicer than raw concrete would be nice, even if it's just a paint and fleck kit: http://www.epoxymaster.com/index.php/store/category/decorative-fleck-non-slip/product/116-custom-decorative-fleck-create-your-own-pattern
I could do a NC dogwood in Filipino sun.
Phase 9: Built-in Shelves and Desks
Build some shelves out of studs and plywood.
Or.
Buy some welding gear and some square tube stock and practice welding by making shelves and desks.
Regulations
Permits
Per http://durhamnc.gov/ich/cb/ccid/Pages/Accessory.aspx:
A building permit is required to place or build an accessory structure (i.e. storage building, detached carport, garage, pool house, etc.) on your property.
Certain items are required to obtain a building permit for an accessory building, the first of which is two copies of your site plan. A site plan is an illustration on paper showing the shape of your lot, the relative location of your house within this lot perimeter, and the intended location of the accessory structure you are going to place on your lot. An easy way to arrive at a site plan is to run two copies of an existing survey, which you may have in your bank mortgage info, and simply draw in the intended building location.
If the accessory building is 144 square feet or less and less than 12 feet in length on any side, then the only other thing you must do to obtain a permit is to fill out an application and submit it with the two site plan copies. If the building is greater than 12 feet length on a side, then two copies of structural drawings must also be submitted. These drawings do not have to be prepared by an engineer or architect, but must be accurate and meet NC State Building Code for structural requirements. Do-It-Yourself books purchased in building material stores may be helpful, but are not necessarily written to meet local code requirements.
Setback Requirements
7.2 Accessory Buildings and Structures
Accessory buildings and structures, not including accessory dwellings (See Section 7.3 (1)), shall be subject to the following additional requirements:
1.The building shall not be located in any front yard. The only exception shall be when the lot is over 2 acres in size, in which case the building may be located in front but not in the required front yard.
2.The building shall not be located in any required side yard space, and accessory buildings in the Residential 5 (R-5) shall be no closer than 3 feet to any property line. Accessory buildings in the remaining zones shall be no closer than 5 feet to any property line. Any accessory buildings located less than 5 feet from the property line shall construct a wall meeting North Carolina Building Code Standards for fire obstruction on that side of the building facing the property line.
3.Accessory buildings in the rear or side yards of corner lots whose rear or side yards are adjacent to a front yard of the adjacent lot, shall maintain a setback equivalent to the required front yard setback of the adjacent lot and outside the required rear yard of the lot where the accessory building is to locate.
4.In residential areas the height of an accessory building shall not exceed 15 feet when the building is within 10 feet of the property line.
5.No accessory building shall be utilized unless the primary structure is also utilized.
6.If an accessory building is structurally attached to the primary structure by a wall or roof, it shall be deemed a part of the primary structure.
Slab
Per NC building code table 1904.3, slab must have compressive strength of at least 3000 PSI.
Cost Estimates
Slab Foundation
This cost calculator estimates the cost of the 750 sqft of slab to be about $2,536.93
Total
* 750 sqft (30×25)
| Permit | $250 |
| Ground Clearing | $? |
| Slab | $5500 |
| Building | $9290.00 |
| Total | $15,750.00 |
|---|
* 500 sqft (25×20)
| ITEM | EST | ACTUAL |
|---|---|---|
| Permit | $250 | |
| Ground Clearing | $? | $0 |
| Slab | $3,500 | $3,500 |
| Building | $7,960.00 | $7,981 |
| Total | $11,710.00 | $11,481 |
NEXT STEPS
The shop has been built. Now, how to make it useful?
Floor
Mitigate moisture and it's a bit prettier than straight concrete.
- Etcher ( from kit below )
Tools
- Spreader
- shoe tacks
- solvents for cleaning up
- 1 x Plastic garden watering can
- 1 x 5 gallon bucket
- 1 x Weiler 44026 Palmyra Fill Deck Scrub Brush with Wood Block, 10“ Overall Length
- 1 x More utility knife bladest
- 1 x Disposable tray (we have metal base somewhere)
- 1 x Rollers (we have these somewhere)
- 1 x Mr. Long Arm 3212 Pro-Pole Extension Pole, 6-to-12-Feet (we have this somewhere)
- 4 x Paint Sticks (free behind the counter at Home Depot)
Materials
- 2 x pieces of medium sized cardboard
- 3 x Rust-Oleum 301239 Moisture Stop
- 2 x Rust-Oleum 261845 Epoxy Garage Floor
- 2 x Rust-Oleum 279847 EPOXYShield Anti Skid 3.4-Ounce
- 1 x Wooster Brush R232-9 Epoxy Glide Roller Cover, 1/4-Inch Nap, 9-Inch
- 1 x Premier Paint Roller 69730 Plastic Drop Cloth, 9-Feet by 12-Feet, 3-Pack
POWER
- Either EMT (electrical metal tubing) to route around the shop.
- 100A Breaker box - suitable for branch from house or own box (need to research if Duke power does cheap meters for workshops/garages)
- LED over head lights
- I could include a transfer switch and use the generator to power the workshop–it's added cost but will let me delay the cost of getting a mains hook up.
- The workshop seems like the perfect place to experiment with DIY solar power tie-in. Boy, I'd love to have a stack of salt-water batteries.
- In the very least some deep-cycle batteries for running ventilation fans seems like a good idea
Required tools
- Conduit cutting tools (probably already have an adequate saw, but a purpose-made tool will speed things along)
- Conduit bending tool (good for other stuff too!)
- 12' ladder for running wiring and lights
- Proper wire strippers (going to be doing a lot of stripping, time to get a good pair of strippers)
Big Ticket Tools
I'm sure I've made this list in a dozen places already.
- Table saw
- Band saw
- Stick welder
- Miter saw
- Drill press